
Django framework를 이용해 게시판 만들고 AWS에 배포하기
문서 목적
이 문서는 Django, python을 모르는 개발자를 대상으로 작성했으며 추후 다른 사람이 개발 할 경우 시행착오를 줄이는데 도움을 주기 위하여 작성하였다.
처음 배울 때 겪었던 시행착오와 찾아봤던 정보들, 사이트를 중심으로 기술하였다.
장고를 배우기 위해 토이프로젝트를 진행했으며 프로젝트의 목적은 Django와 AWS를 이용해 상용화 서버를 만드는 것이며 기능 구현 후 Test code도 작성했다.
토이 프로젝트 환경 및 구조
1. 개발 환경
-
MacOS Mojave 10.14.2
-
Python 3.6.7
-
Nginx/1.14.0
-
Django 2.1.4
-
uWSGI 2.0.17.1
-
MySQL 5.6.41
-
AWS
-
EC2 ubuntu 18.04 LTS
-
RDS- MySQL 5.6.41
-
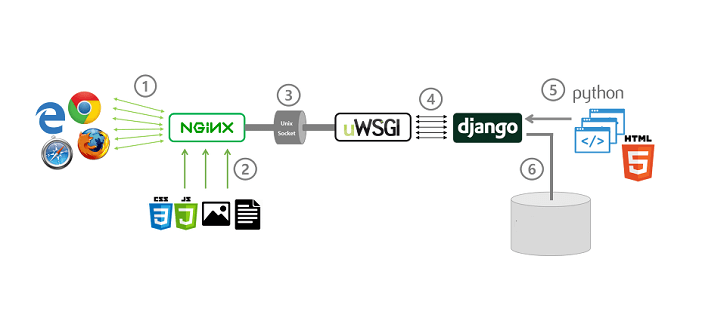
2. 서버 구조
- 서버
the web client <-> the web server <-> the socket <-> uwsgi <-> Django
브라우저 요청 -> 정적인 페이지/파일은 nginx에서 응답 / 동적데이터는 nginx -> uWSGI를 통해 django에서 처리
진행 내용
게시판 기능 정의 및 DB 모델
토이프로젝트는 게시판 기능을 만드는 것을 목표로 하였으며 다음과 같은 기능을 구현하였다.
회원가입 관련 기능
-
첫 화면에서 로그인이 되어 있지 않으면 로그인 화면 페이지
-
회원 가입
-
로그인, 로그아웃
게시글 관련 기능
-
글 쓰기 기능
-
글 삭제 기능
-
글 편집 기능
댓글 관련 기능
-
댓글 작성
-
댓글 삭제
DB Model
-
Post ( title, text, author, published_date)
-
Comment (author, text, published_date)
로컬 환경에서 게시판 만들기
자세한 사항은 장고걸스 사이트(https://tutorial.djangogirls.org/ko/) 참고해 게시판을 만들면 된다. 친절하게 세세하게 설명해주고 있어 처음 보기에 좋다고 생각된다.
장고걸스에서 쓰는 버전은 구버전이라 url부분은 Django 공식 사이트의 튜토리얼을 참고하면 도움이 된다.(https://docs.djangoproject.com/ko/2.1/intro/tutorial01/)
-
urls 예시
from django.urls import path

from . import views

urlpatterns = [
    path('', views.index, name = 'index'),
    path('<int:pk>/', views.post_detail, name = 'post_detail'),
    path('post/new/', views.post_new, name='post_new'),
    path('post/edit/<int:pk>/', views.post_edit, name='post_edit'),
    path('post/remove/<int:pk>/', views.post_remove, name='post_remove'),
    path('<int:pk>/comments/', views.add_comment_to_post, name = 'add_comment_to_post'),
    path('comments/<int:pk>/remove/', views.comment_remove, name = 'comment_remove'),
]
Virturalenv 만들 때 예시
Create : virtualenv .venv

Activate : source .venv/bin/activate
Python Class 관련 함수
초기화 함수
- __init__ : 인스턴스를 만들 때 실행되는 함수
문자열화 함수
- __str__ : 인스턴스 자체를 출력 할 때의 형식을 지정해주는 함수
AWS 프로젝트 배포하기
링크 (https://nachwon.github.io/django-deploy-1-aws/)를 참고하되 다른 점만 서술한다.
EC2에는 git을 통해 소스코드를 올렸다.
링크는 pyvenv로 진행했으나 해당 프로젝트는 virtualenv를 이용해서 진행해 설정 부분이 다르다.
-
uwsgi 설치 후 되는지 명령어로 확인
uwsgi --http :8000 --home /home/ubuntu/<project name>/.env --chdir /home/ubuntu/<project name>/<app name> -w mysite.wsgi -
location /static 부분은 파이썬 명령어 collectstatic했을 때 static파일들이 모이는 곳으로 경로 설정을 해줘야 된다.
-
mysite.conf ( nginx 설정파일)
server { listen 80; server_name *.amazonaws.com; charset utf-8; client_max_body_size 128M; location / { uwsgi_pass unix:///tmp/app.sock; include uwsgi_params; } location /static { alias /home/ubuntu/<project name>/<app name>/static; } location /media { alias /home/ubuntu/<project name>/<app name>/media; } location / { uwsgi_pass django; include /home/ubuntu/<project name>/uwsgi_params; } } -
이 파일을 sites-enabled 폴더넣어주고 default 파일 삭제한다.
-
uwsgi.service
[uwsgi] chdir = /home/ubuntu/<project name>/<app name> module = mysite.wsgi:application home = /home/ubuntu/<project name>/.env uid = ubuntu gid = ubuntu socket = /tmp/mysite.sock chmod-socket = 666 chown-socket = ubuntu:ubuntu enable-threads = true master = true vacuum = true pidfile = /tmp/mysite.pid logto = /home/ubuntu/<project name>/<app name>/@(exec://date +%%Y-%%m-%%d).log log-reopen = true -
오류중에 uwsgi_prams 파일이 없어서 나는 오류가 있다. 해당 오류인지 확인하려면 etc/nginx/ 에서 확인 후 없다면 파일 생성 후 하단의 내용을 넣어주면 된다.
uwsgi_param     QUERY_STRING            $query_string;
uwsgi_param     REQUEST_METHOD          $request_method;
uwsgi_param     CONTENT_TYPE            $content_type;
uwsgi_param     CONTENT_LENGTH          $content_length;

uwsgi_param     REQUEST_URI             $request_uri;
uwsgi_param     PATH_INFO               $document_uri;
uwsgi_param     DOCUMENT_ROOT           $document_root;
uwsgi_param     SERVER_PROTOCOL         $server_protocol;
uwsgi_param     UWSGI_SCHEME            $scheme;

uwsgi_param     REMOTE_ADDR             $remote_addr;
uwsgi_param     REMOTE_PORT             $remote_port;
uwsgi_param     SERVER_PORT             $server_port;
uwsgi_param     SERVER_NAME             $server_name;
Test code
코드 테스트는 시나리오를 통한 테스트(selenium)과 API 테스트(Django test tool)로 진행했다.
참고했던 사이트와 만들었던 코드를 올려놓고 향후 테스트 관련 더 배우게 되면 추가하겠다.
-
Selenium은 실제 서버에 접속을 해서 테스트를 진행하는 것이기 때문에 게시물 생성시 삭제까지 진행해야 안남는다.
-
장고 테스트 툴은 테스트할때마다 새로 DB를 만들어서 진행해 게시물 관련 테스트를 하려면 setUp함수로 미리 로그인, 생성을 해줘야됨.
-
Selenium 웹드라이버는 맥, 유닉스가 다르고 AWS EC2에서 진행시 headless 옵션을 넣어야 된다.
-
selenium test
import unittest import time from selenium import webdriver from selenium.webdriver.common.keys import Keys class NewVisitorTest(unittest.TestCase): def setUp(self): self.browser = webdriver.Chrome('./chromedriver') def tearDown(self): self.browser.quit() def test_can_signup(self): self.browser.get('{AWS_EC2_IP}') time.sleep(2) # 회원가입한 아이디로 로그인을 한다 self.browser.find_element_by_id('id_username').send_keys('testid1') self.browser.find_element_by_id('id_password').send_keys('tjddnekd1') self.browser.find_element_by_xpath("//input[@value='login']").click() time.sleep(2) if __name__ == '__main__': unittest.main(warnings='ignore') -
Django API test
from django.test import TestCase
from django.urls import resolve, reverse
from .views import index, post_new, post_remove
from django.http import HttpRequest
from .models import Post
from django.contrib.auth.models import User
from django.utils import timezone

# Create your tests here.
class HomePageTest(TestCase):
    def test_root_url_resolves_to_home_page_view(self):
        found = resolve('/')
        self.assertEqual(found.func, index)

    def test_not_login_home_redirect(self):
        response = self.client.get('')
        self.assertEqual(response.status_code, 302)
        self.assertEqual(response['location'], '/accounts/login')

    def test_login_home_redirect(self):
        self.user = User.objects.create_user(username='testuser', password='12345')
        self.assertEqual(User.objects.count(), 1)

        response = self.client.post('/accounts/login/', {'username':'testuser', 'password':'12345'})
        self.assertEqual(response.status_code, 302)
        self.assertEqual(response['location'], '/')

class PostPageTest(TestCase):
    def setUp(self):
        self.user = User.objects.create_user(username='testuser', password='12345')
        self.client.login(username= 'testuser', password = '12345')
        self.assertEqual(User.objects.count(), 1)

        first_Post = Post()
        first_Post.text = 'first post text'
        first_Post.author = self.user
        first_Post.published_date = timezone.now()
        first_Post.pk = 1
        first_Post.save()

    def test_post_detail_template(self):
        response = self.client.get('/1/')
        self.assertTemplateUsed(response, 'board/post_detail.html')

    def test_post_new_template(self):
        response = self.client.get('/post/new/')
        self.assertEqual(response.status_code, 200)

    def test_post_delete(self):
        response = self.client.get(reverse(post_remove, args=[1, ]))
        self.assertEqual(response.status_code, 302)
참고 자료 정리
게시판 작성 참고 자료
AWS 배포 참고 자료
TEST 참고 자료
-
TDD 관점에서의 간단한 테스트 코드 작성: https://wikidocs.net/11058
-
클라우드 상에서 Selenium을 이용한 Django 기능 테스트 자동화: https://www.pycon.kr/2016apac/program/37
-
파이썬에서 편하게 테스트 케이스 작성하기: https://www.pycon.kr/2017/program/132
-
유닛테스트를 작성하는 3가지 접근 방법: http://americanopeople.tistory.com/285?category=567685
-
Saving User Input: testing the database: http://www.obeythetestinggoat.com/book/chapter_post_and_database.html
댓글남기기